How to Make an Ice Skating Rink
A research-backed guide to building an ice skating rink — site prep, lumber and liner sizing, fill depth, freeze times, and how commercial rinks differ.
USA Skating Rinks Editorial Team
Updated May 29, 2026 · Editorial policy
Building an ice skating rink ranges from a weekend backyard project framed in 2x lumber to a full mechanically refrigerated arena with brine piping in a concrete slab. The fundamentals are the same in both cases: a contained, level surface; a waterproof barrier; a clean fill; and cold temperatures held long enough for the water to set. This guide walks through what backyard builders actually do, what commercial rinks require, and the numbers manufacturers and industry suppliers publish for each step.
Step 1: Pick and measure the site
The single biggest variable in a backyard build is ground slope. Guides from NiceRink and Iron Sleek both advise measuring slope before buying any materials, because slope determines how tall the boards on the deep side need to be and how much water the rink will hold. A common approach is driving wooden stakes at each corner, running string between them, and using a line level or laser level to record the drop across the footprint.
The frame should sit on the most level patch of yard you have, but it does not need to be perfectly flat — Iron Sleek’s instructions describe backfilling soil under the boards to close gaps once the frame is squared. Diagonals are squared with the Pythagorean theorem before brackets are locked in place.
Step 2: Build the perimeter frame
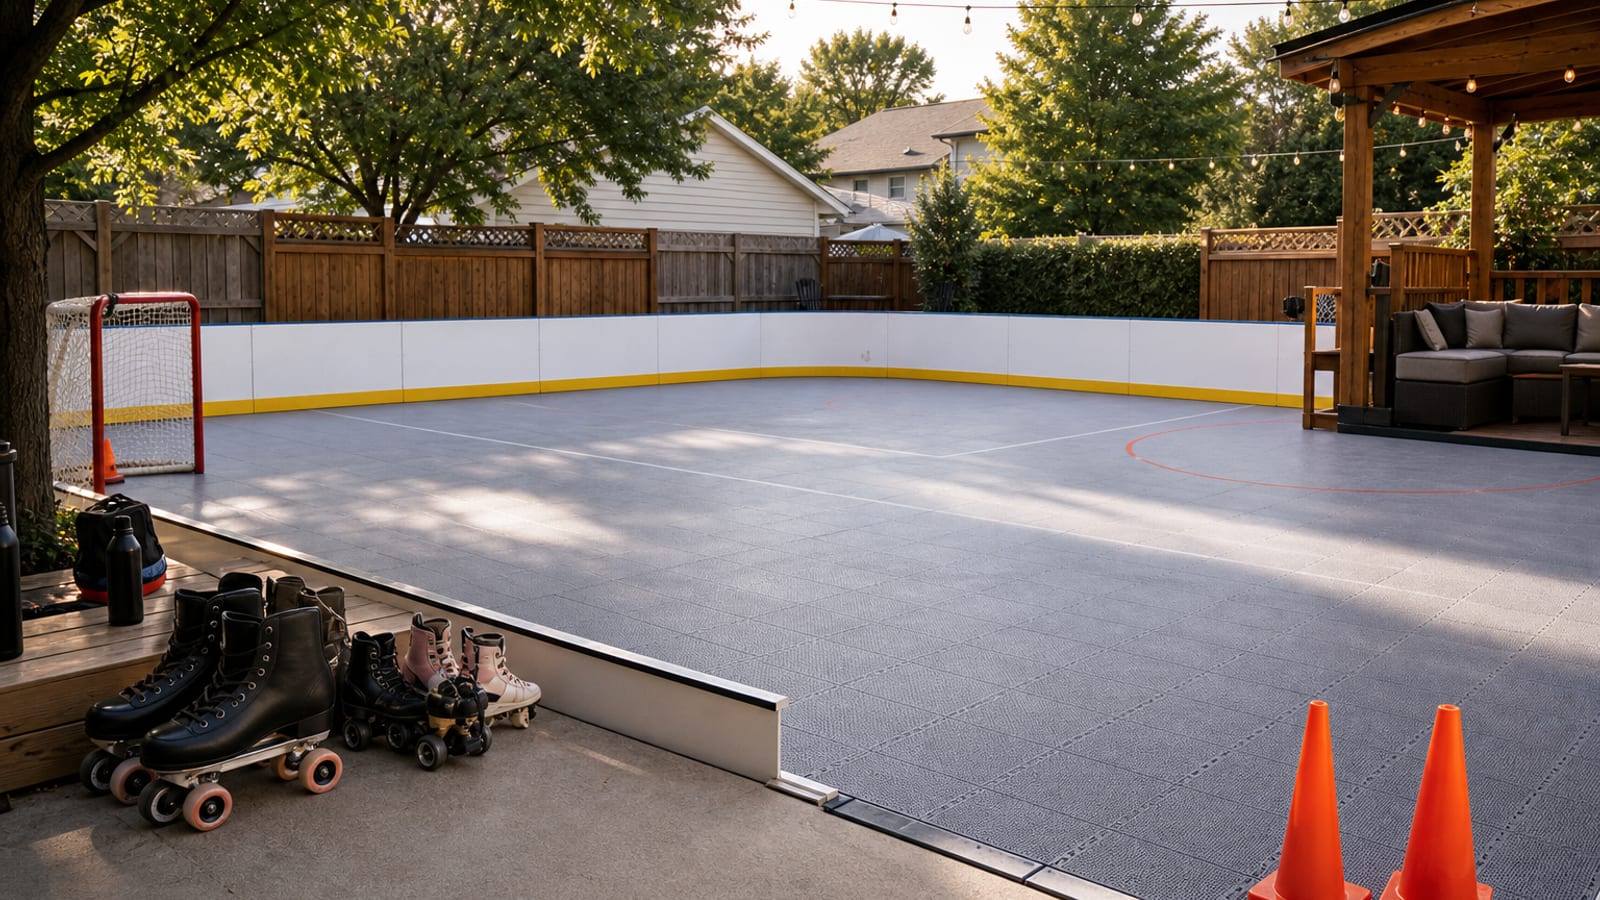
A backyard rink needs three components: boards, bracing, and a liner. Iron Sleek recommends dimensional lumber over plywood, noting that plywood is less durable and flexes under water pressure. Brackets typically sit 4 feet apart along straight runs, with dedicated corner brackets at each turn. Deeper rinks, or those holding more water on the low side, may need bracing every 2 feet instead of every 4.
Common board choices include:
- 2x lumber (such as 2x10 or 2x12) braced with steel brackets
- Pressure-treated plywood sheets, where allowed
- Pre-formed plastic boards like NiceRink’s HDPE panels, which use built-in pegs and bracket systems and are commonly run at heights up to 4 feet
Before the liner goes in, the inside face of every board should be checked for nails, splinters, or screw points that could puncture plastic. Heavier kits aimed at hockey use also add kickplates and corner radiuses to keep pucks in play.
Step 3: Lay the liner
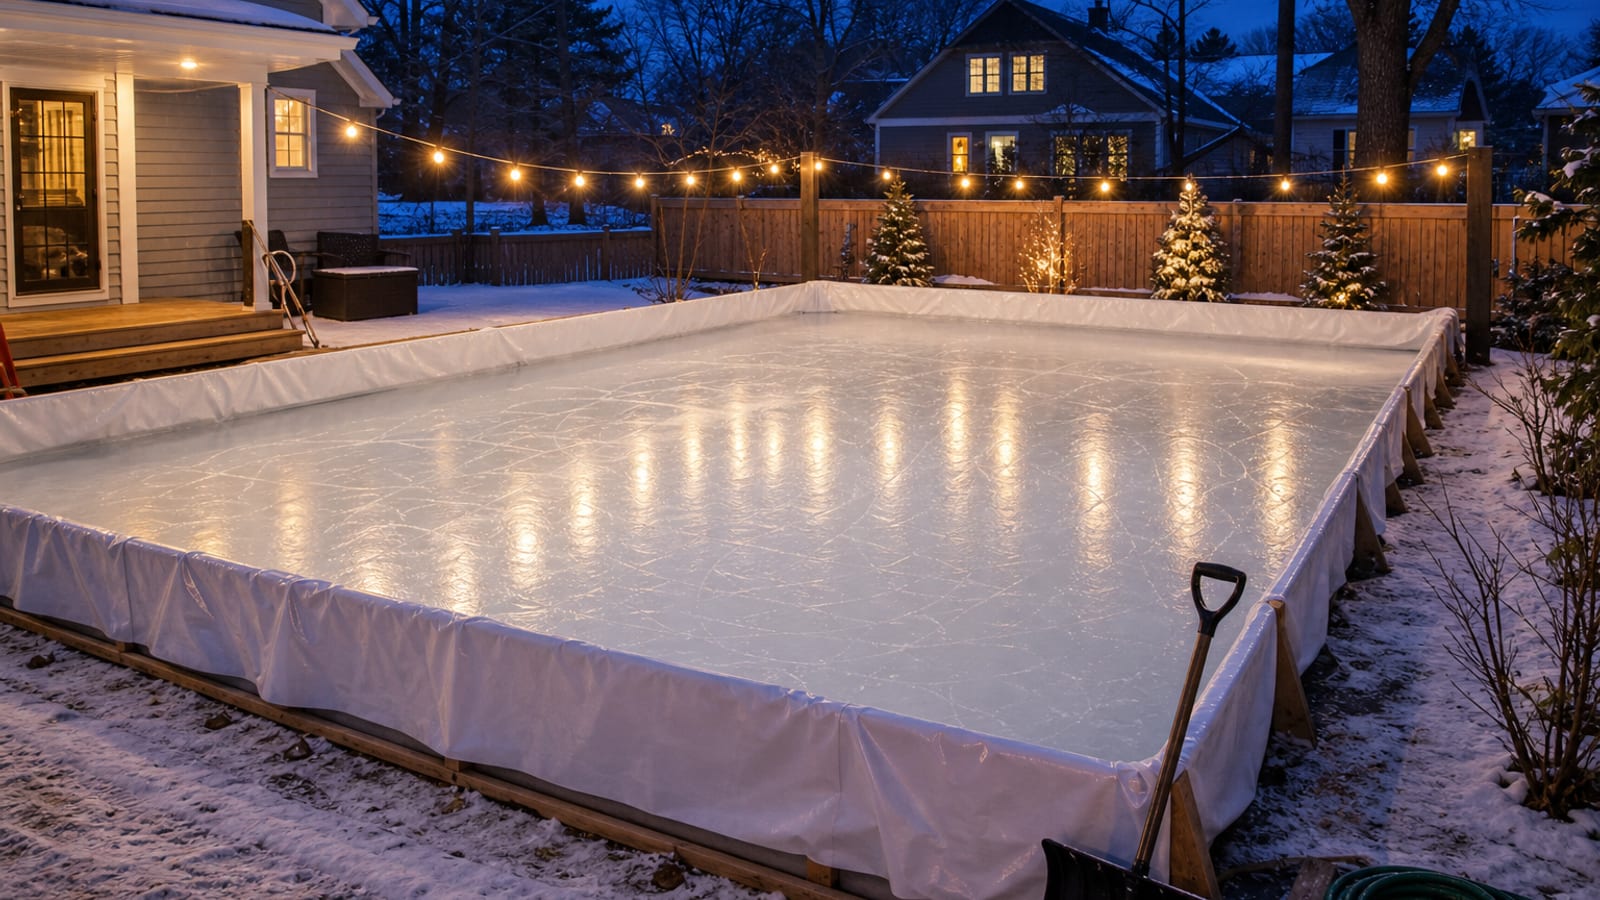
The liner is what actually holds the water — the boards just contain the liner. Iron Sleek’s guide states the liner should be 4 to 5 feet longer and 4 to 5 feet wider than the frame, leaving slack to drape into the corners and over the top of the boards, where it can be stapled to the outside face.
Timing matters. NiceRink and How To Hockey both advise installing the liner only when you are ready to fill and when the forecast shows nights around 20°F and days at or below freezing. Sun exposure on an unfilled white or clear liner can degrade the plastic, and wind will catch slack material before water weighs it down.
Step 4: Fill the rink — all at once
This is the step most first-time builders get wrong. Industry guides are consistent: fill the rink in a single continuous pour, not in layers. Filling in layers freezes the bottom sheet to the liner and creates seams that can split. A water-delivery service is often used for larger rinks rather than a garden hose.
Iron Sleek’s instructions call for a minimum of 4 inches of water at the lowest point of the rink, and warn against letting water spill over the top of the frame. Once filled, the rink needs roughly three or more days of temperatures below 20°F before it is safe to step on, with a working ice thickness of at least 3 inches commonly cited for recreational skating.
Step 5: Maintain the surface
Daily maintenance is what separates a glassy rink from a rough one. The accepted backyard technique mirrors a Zamboni: clear loose snow first with a shovel, broom, or power broom, then flood with a thin layer of hot water and let it freeze. Snow left on the surface insulates the ice and softens it, so most guides recommend removing it as soon as it falls.
For more on where people skate, see our skating rinks directory and our regional pages such as Ohio roller rinks.
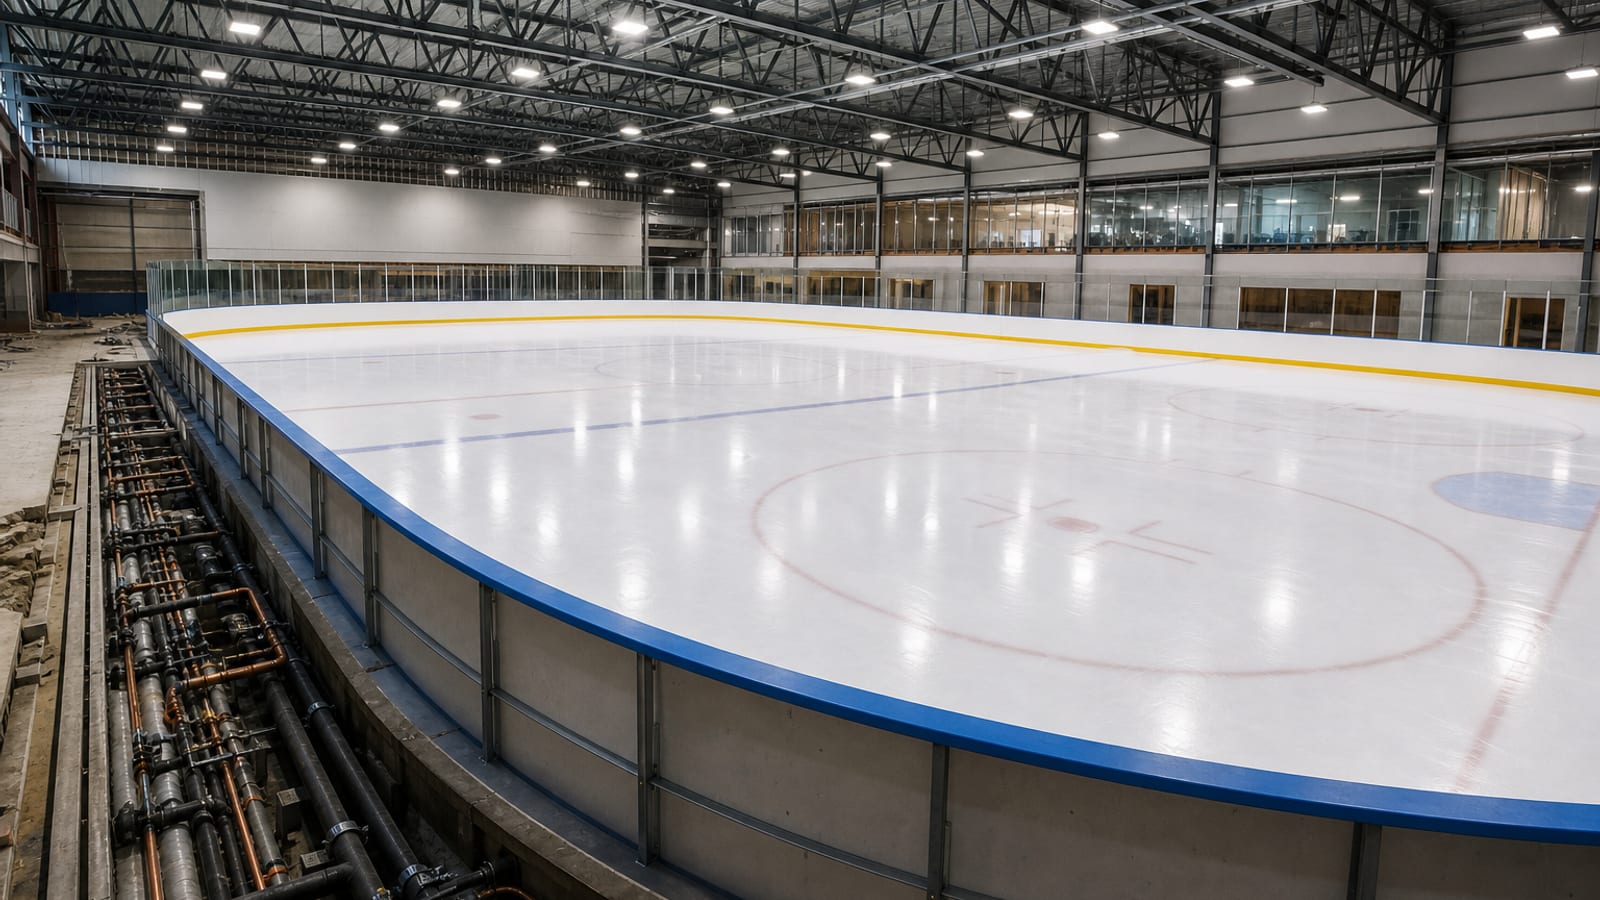
How commercial ice rinks are different
A permanent indoor or outdoor arena does not rely on weather. Instead, a refrigeration plant chills a secondary fluid — usually a propylene or ethylene glycol solution, or a calcium chloride brine — and pumps it through pipes embedded in a concrete slab. Ammonia is the most common primary refrigerant in this configuration, though CO2 systems are increasingly used in newer builds.
Typical slab and ice specifications reported by refrigeration suppliers include:
| Parameter | Typical range |
|---|---|
| Concrete slab depth | 7–10 cm |
| Pipe spacing in slab | 10–16 cm on center |
| Slab temperature during freeze-down | -7°C to -9°C |
| Operating ice surface temperature | -4°C to -6°C |
| Working ice thickness | 1.25–1.5 in (3–4 cm) |
| Initial freeze time | 48–72 hours |
NHL-sized rinks measure 200 feet by 85 feet — a useful reference point if you are sketching out an outdoor pad even at hobby scale.
FAQ
How cold does it need to be to make a backyard ice rink?
Builder guides from NiceRink and How To Hockey recommend installing the liner and filling only when nighttime temperatures reach roughly 20°F with daytime highs at or below 32°F, and allowing at least three days of sustained cold below 20°F before skating.
How thick should the ice be before you skate on it?
For backyard recreational use, 3 to 4 inches of solid ice is the common minimum cited in DIY guides. Commercial refrigerated rinks typically maintain a thinner, controlled surface around 1.25 to 1.5 inches because the slab beneath is continuously cooled.
Do you need a level yard to build a rink?
No, but you need to know the slope before you build. Iron Sleek and NiceRink both recommend measuring with stakes and a line or laser level, then sizing the deep-side boards tall enough to hold at least 4 inches of water at the lowest corner without overtopping the frame.
Sources
- Iron Sleek / Tarp Supply — Backyard Ice Rink Building Guide — bracket spacing (4 ft), liner oversizing (4–5 ft on each side), 4-inch minimum fill, lumber vs plywood, 3-day freeze guidance
- How To Hockey — How to Build a Backyard Hockey Rink — boards/bracing/liner fundamentals, bracing-spacing-by-depth rule, fill-all-at-once guidance, 20°F/32°F install conditions, Zamboni-style maintenance
- DIY Pete — Outdoor Hockey Rink Guide — NiceRink 4-foot board height, 3–4 inch skating thickness, squaring with Pythagorean theorem, snow-removal practice
- NiceRink — Installation Information — manufacturer reference for backyard rink installation system
- G.A. Enns — Refrigeration for Hockey Rinks — indirect refrigeration loop, slab depth (7–10 cm), pipe spacing (10–16 cm), slab and surface temperatures, 1.25–1.5 in ice thickness, 48–72 hour freeze
- Natural Refrigerants — Ice Rinks: Which Refrigerant Is Best? — ammonia primary plus brine/glycol secondary as standard commercial configuration