Home Ice Skating Rink: Backyard Setup Guide
Plan a home ice skating rink with verified costs, liner specs, board sizing, and freezing steps from NiceRink, Iron Sleek, and HockeyShot guidance.
USA Skating Rinks Editorial Team
Updated July 12, 2026 · Editorial policy
A home ice skating rink turns a backyard into a private skating surface for the winter months. The build is straightforward in concept — a frame, a liner, and water — but the details around site selection, liner thickness, board height, and flood timing determine whether the ice lasts a season or fails after the first thaw. This guide walks through the decisions, drawing on installation guidance from NiceRink, Iron Sleek, HockeyShot, and published cost data from YardRink.
Choose a Build Path: DIY, Kit, or Refrigerated
Three paths dominate residential rink projects, and they sit at very different price points.
| Build type | Typical cost range | Source |
|---|---|---|
| DIY from raw materials | $500–$1,500 | YardRink |
| Pre-assembled kit (standard) | $2,000–$10,000 | YardRink |
| Larger or refrigerated systems | Up to $50,000+ | YardRink |
For a DIY build, YardRink’s published breakdown lists roughly $50–$400 for the plastic liner, $200–$500 for boards, $50–$200 for brackets, and smaller line items for stakes, fasteners, and clamps. A bracket-based kit such as the Iron Sleek 30’ x 50’ kit is listed at $456.38 and ships with 28 standard brackets, 8 corner brackets, and a 35’ x 55’ 6-mil all-white liner; the homeowner sources the lumber separately (Iron Sleek recommends 16 pieces of 2”x12”x10’ boards for that size).
NiceRink sells a similar “Rink-in-a-Box” concept with brackets, a liner, patch tape, underwater glue, and instructions bundled in retail-sized kits like the 20’ x 40’ package.
Pick the Site and Measure the Slope
Site grade is the single most consequential variable. HockeyShot’s building guide is explicit: measure slope before buying components, because the deep end of the rink has to hold enough water that the shallow end still ends up with about 4 inches of ice. Their example: an 8-inch slope across the rink means planning for roughly 12 inches of water depth at the deep end.
Practical site checks:
- South-facing lawns get more sun and melt faster; partial shade helps.
- Avoid spots directly under deciduous trees if leaves are still falling.
- Keep the footprint clear of sprinkler heads, dog runs, and septic field access.
- Confirm a water source within hose reach for the initial flood and resurfacing.
Iron Sleek’s bracket system is rated to hold up to 18 inches of water, which sets a practical ceiling on slope tolerance for most residential kits. Steeper yards need bracing or a smaller footprint.
Frame It: Brackets, Boards, and Bracket Spacing
Most modern home rinks use a metal-bracket-plus-lumber frame rather than a free-standing wood box. Iron Sleek’s published spacing guidance scales with water depth: brackets can sit roughly 8 feet apart when water is under 8 inches deep, but should tighten to about 2 feet apart at 16–18 inches of depth. Corner brackets and ground stakes are added as depth increases.
Board sizing follows the same logic. A common spec for kits in the 30’ x 50’ range is 2”x12” dimensional lumber; taller water columns require stacked boards or extension brackets (Iron Sleek sells extension brackets in 4-packs to raise standard 12-inch boards). HockeyShot recommends setting boards 2–3 weeks before the planned flood so the brackets “freeze in” and the grass goes dormant before water hits.
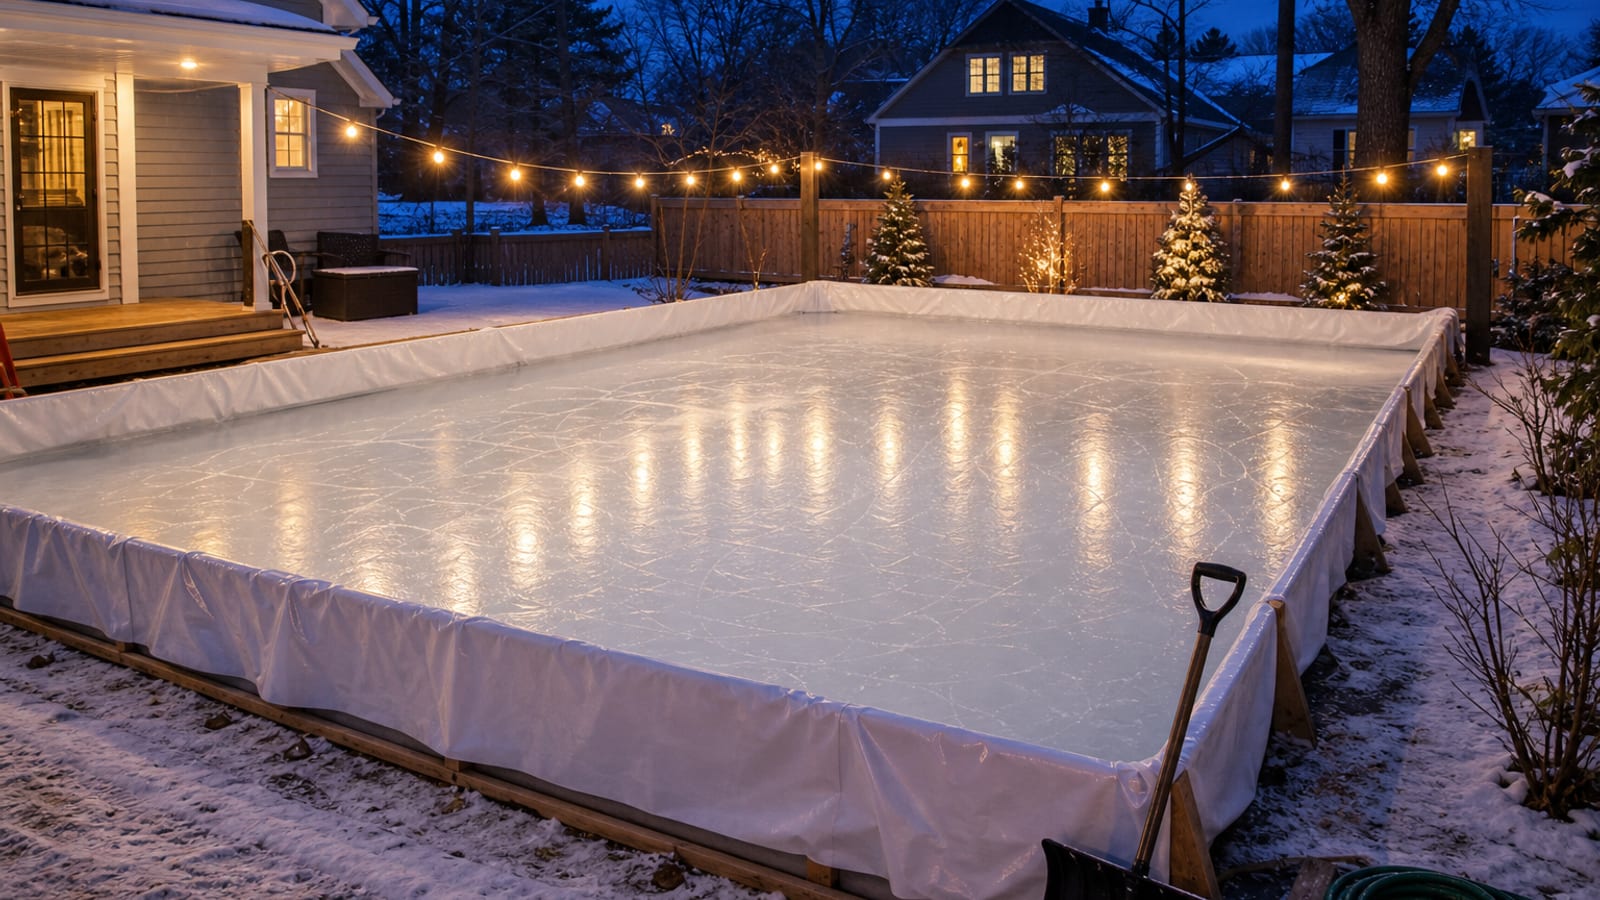
Choose the Liner
The liner is the only thing between the water and the ground, and the wrong choice ruins a season.
- Thickness. NiceRink offers liners in 5, 6, and 10 mil weights; 6 mil is the common residential default. Iron Sleek’s best-seller is also a 6 mil white liner.
- Color. Both manufacturers and HockeyShot recommend white-on-both-sides liners. White reflects UV, which keeps ice colder and protects the grass below. Clear, blue, and black liners are widely described in industry guidance as grass killers.
- Material. Solid poly liners outperform woven tarps for skating use because tarps depend on a thin coating that wears under blade traffic.
Install on a calm morning, smooth out wrinkles before any water goes in (wrinkles freeze in permanently), and weight the corners with shallow water to keep wind from lifting the sheet.
Flood and Freeze
Timing the first flood matters more than the volume. HockeyShot’s guidance is to wait until nighttime lows consistently sit in the 18–23°F range before filling. Cold nights drive ice growth faster than daytime sun melts it, and with a proper liner and that temperature window, a skateable surface typically forms in 3–5 days.
A general flood sequence used across manufacturer guides:
- Fill from the center outward so water distributes evenly under the liner.
- Bring the shallow end to roughly 4 inches above grade before stopping.
- Let the column freeze solid before flooding additional layers.
- Resurface with thin warm-water floods between skating sessions.
Expect the initial fill to consume a few thousand gallons of water depending on footprint and slope.
Budget the Hidden Costs
YardRink’s cost analysis flags ongoing expenses that first-time builders often miss: liners may need replacement every season or two (several hundred dollars), sloped yards require extra bracing, and accessories — LED lighting, skater step-overs, hand resurfacers, replacement pucks — accumulate quickly. Permit costs are generally low for a seasonal rink but may apply for permanent dasher boards or outdoor lighting.
For families who skate often but don’t want the annual setup, synthetic and refrigerated options exist at the higher end of the price range; Iron Sleek lists portable refrigerated rinks that extend the season above the roughly 50°F threshold where natural ice fails.
FAQ
How big should a first home ice skating rink be?
Kit manufacturers offer footprints ranging from compact 20’ x 20’ boxes up to 35’ x 75’ family rinks. A 20’ x 40’ or 30’ x 50’ size is a common starting point — large enough for general skating and shooting practice, small enough that flooding and maintenance stay manageable.
How thick does the ice need to be to skate on?
HockeyShot’s guide targets about 4 inches of ice at the shallow end as a working minimum. Thicker ice is more forgiving of warm afternoons and aggressive stops, which is why most builders aim for the shallow end to fully freeze before adding maintenance floods.
Will a backyard rink kill the lawn?
A white-on-white liner reduces lawn damage by reflecting UV and keeping soil temperatures stable. HockeyShot, NiceRink, and Iron Sleek all recommend white liners for this reason; clear or dark liners are widely reported to kill grass underneath. Setting boards 2–3 weeks before flooding also helps grass go dormant before being covered. For more on skating venues beyond the backyard, see the Pennsylvania roller rink directory.
Sources
- NiceRink Rink-in-a-Box product details — liner thickness options (5, 6, 10 mil), 20’x40’ kit contents
- Iron Sleek 30’ x 50’ Backyard Ice Rink Kit — kit price, components, lumber spec, bracket spacing chart
- Iron Sleek company site — bracket load rating (18 inches of water), liner pricing, product tiers, refrigerated rink threshold
- YardRink: How Much Does a Backyard Ice Rink Cost? — DIY and kit cost ranges, hidden costs, material line items
- HockeyShot Ice Rink Building Tips — slope measurement, water-depth planning, white liner rationale, 18–23°F flood window, 2–3 week board pre-set